
Voronoi Cat Fail
January 31, 2013
 Leave a Comment » |
  3D Printing, FAIL | Tagged: cats, meow, miniatures, voronoi |
  Permalink
 Posted by zheng3
/dev/random : No instructions provided
January 27, 2013
I’m moving the comic to Sunday-only for two reasons. One, I feel like I’m spamming myself by posting comics three times a week.
Two, the vast majority of comics generated by the script just aren’t funny. My code generates one comic every ten minutes, so over the course of a week that should be over 1000 comics to choose from. One of those has to be amusing. But three?
Anyway, hipsters are always a good punching bag, even if they’re a bit past their humor sell-by date in 2013.
The grody code at the beginning of Character 1’s speech balloon shows that my HTML filter isn’t quite catching everything the new Thingiverse throws out there, so I’ll do a little tweaking this week and take care of that.
1 Comment | /dev/random, FAIL | Tagged: comics, hipsters, nerd humor, python, robots, self-spamming, thingiverse | Permalink
Posted by zheng3
Joining the Voronoi Cargo Cult
January 26, 2013If you are like me, you do not want to become an expert in Meshlab. You do not really care about learning the interface, because you’ve already learned fifty other interfaces and you do not want to be an expert in every Tom-Dick-and-Harry Open Source 3D application.
You want an easy-to-follow, step-by-step, hand-holding process that pretty much guarantees you a Voronoi surface.
You want to join the Voronoi cargo cult.
Voronizing isn’t rocket science, but other tutorials I have seen online have skipped one crucial step that makes it all but impossible for cargo cultists like me to get a Voronized surface out of Meshlab. I beat my head against the wall for hours until I stumbled upon the solution.
Now that my bruises have yellowed and my rage has mellowed, I’ve written my own tutorial at the Voronoi-bloxen inspired request of Seej player, maker, and all around nice guy AndyP.
Ok, here we go.
Step 1: Download, install, and launch Meshlab. It’s free. I’m running Meshlab 1.3.2 on OSX, but I imagine the UI will be mostly the same no matter what OS you’re on.
Step 2: We’re going to Voronize a sphere. Go to Filters->Create New Mesh Layer->Sphere.

Sphere! Woot.
The process of Voronizing involves creating lots of vertices on the target mesh and then creating some voodoo connection between them to make the Voronoi pattern. So first we need more vertices on the sphere.
Step 3: Go to Filters->Remeshing, Simplification, and Reconstruction->Subdivision Surfaces: Loop. I just accepted the defaults. When it’s done, you’ll see that the default sphere looks a lot smoother.
Step 4: Sampling the new vertices. Choose Filters->Sampling->Poission-disk sampling. I have no idea what Poission-disk sampling is, but a value of 250 seems to work for this tutorial. Depending on how many verts you created in Step 3, you’ll adjust this number up and down.

I think this just picks a subset of the group of vertices you just created with the Loop subdivision. Remember: you’re in the cargo cult now. Doesn’t matter why this works.
If you click on the POINTS view icon, you’ll see your points. You can click on the SMOOTH view icon to make the model look solid again.

Step 5: Apply Voronoi Vertex Coloring. This is where the magic happens. Select Filters->Sampling->Voronoi Vertex Coloring and make sure the Back Distance checkbox is checked.
After you click Apply, you should have something Voronoi-ish. We haven’t actually made the holes in the mesh that give shapes their cool Voronoi webbing. All we’ve done is color the sampled vertices.

Step 6: This is the step that took me forever to figure out. I’m sharing my process with you because I hope it will help alleviate my MeshLab post-traumatic stress disorder.
Before you do anything else, you must collapse the mesh layer stack. While you’ve been following these instructions, MeshLab has been quietly building a construction history for your sphere in the background.
If you don’t merge the mesh layers, you’ll be stuck at this step forever.
Click on the LAYERS icon.
This will bring up the Layers sidebar. Right-click on the Poisson-disk Samples layer and choose “Flatten Visible Layers” from the contextual menu. Make sure you click “Apply” in the windoid that pops up.

Step 7: Now you just need to remove the interior faces from the sphere. This is easy. Go to Filters->Selection->Select Faces by Vertex Quality.
What is vertex quality? I don’t care. Cargo cult.
Check the Preview checkbox and fiddle with the sliders until the selection looks the way you want it to. Click apply and then close the selection windoid.
Click the Delete Faces button. It’s on the upper right, just above the layers sidebar. You’ll get a single-sided Voronoi webbed mesh.

Step 8: Refine the mesh. This mesh is a little chunky, but Meshlab has a number of smoothing algorithms. Select Filters->Smoothing, Fairing, and Deformation->Laplacian Smooth, click the Preview checkbox, and smooth the mesh as many times as you like. Click apply and close the windoid.

Step 9: Extrude the mesh. Your sphere is still a one-sided surface with no volume. In theory you can fix that by going to Filters->Remeshing, Simplification, and Reconstruction->Uniform Surface Resampling (Who writes these menu items?) and fiddling with the values until you get a surface with a thickness you like.

Or you can do what I did, and export the single-sided mesh and bring it into Maya, or 3DSMax, or whatever the kids are using these days to extrude their geometry.
Slightly more advanced Voronoi cargo cult behavior
We’ve Voronized a sphere, which is like the “Hello, world” of Voronizing.
BUT. Unless you’ve got a stereolithography printer like the Form1, you’ll be hard pressed to print your sphere on your Replicator or your RepRap without support.
(See this Twitter conversation in which I attempt to dupe Formlabs into printing my Voronoi bloxen, but they don’t, because they are too clever. Or perhaps because they are CHICKEN. bock bock bock @bvicarious is collateral damage in this exchange.)
Besides, you didn’t come here to learn how to Voronize spheres. You want to Voronize something you made or downloaded elsewhere. Something with some detail.
Let’s say you want to apply this process to a model with edges, like a cube. You’ll find yourself stymied after step 3 when the Loop Subdivision turns your cube into a rounded globule.

You’ll need more detail at the edges of your model. I have no idea how to do this in MeshLab, but I can make a cube in Maya pretty fast. Here’s a cube with beveled edges. Download it here if you want to try this yourself.

Import the cube into Meshlab and Loop Subdivide it a few times and you’ll see that the edges stay fairly defined. Go through steps 3-7 as before and you’ll wind up with this:

Welcome to the Voronoi Cargo Cult! We have guavas and beer every Wednesday after work.
2 Comments | 3D Printing | Tagged: cargo cult, cube, design, geometry, maya, meshlab, sphere, tutorial, voronoi, wtf | Permalink
Posted by zheng3
Magic: The Gathering Cat Token
January 25, 2013
I’ve returned to playing Magic: The Gathering at the request of my kids, who like all good nerdspawn are completely obsessed with the game. Thankfully it’s weaned them off Dungeons and Dragons for a little while, so I don’t have to spend my Saturday afternoons planning dungeon crawls when my Valentine’s Day Arduino project is behind schedule.
I’m planning to put a new model up every Friday for a couple of weeks. They’re likely to be mostly MTG models, since everybody in the family’s got decks and we cover the gamut of mana colors. Everybody needs tokens.
My wife plays a white/blue deck, and when White Sun’s Zenith appears, suddenly the rest of us are overrun with 2/2 cats.
If you’ve got your own printer, you can help populate the world with cat tokens, just download the model here.
Don’t have access to a 3D printer? No problem. I’ll print you a dozen at my Etsy Store. Meow.
This model is distributed under the Attribution-ShareAlike 3.0 US license. Please remix and enjoy.
Leave a Comment » | 3D Printing, The Forge | Tagged: card games, cats, creative commons, forge, magic: the gathering, meow, miniatures, mtg, tokens, white sun's zenith | Permalink
Posted by zheng3
/dev/random returns
January 23, 2013
Thingiverse recently updated its website and in the process broke my comment scraper. The flu kept me from focusing on a screen long enough to fix, but now it’s repaired.
Leave a Comment » | /dev/random, troubleshooting | Tagged: nerd humor, oop, python, robots | Permalink
Posted by zheng3
The Delrin Plunger
January 21, 2013Fresh off my success clearing the left nozzle on my Replicator, the right nozzle stopped working.
So I cleaned it out with the aforementioned acetone and drilling process, and still no go. So the next thing to try is adjusting the fabled Delrin Plunger.
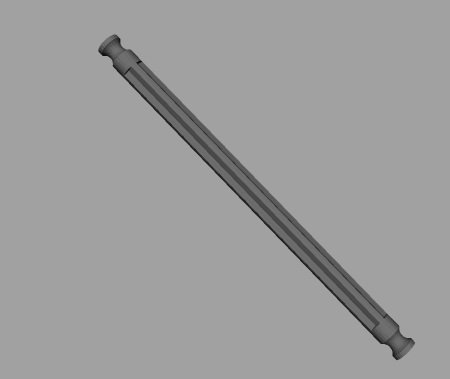
It sounds like Elvish plumbing equipment, but it’s just a little piece of plastic that lives inside the Replicator’s Stepstruder Mk. 8. The plunger’s job is to maintain pressure on the filament so that the stepper can feed it into the heated nozzle.
Over time the filament will wear a groove in the plunger’s head, which reduces contact between the plunger and the filament, which in turn makes it had for the drive wheel to push the filament through the nozzle.
This is what a plunger looks like after about eight months of more-or-less daily use. The blue arrow points to the wear on the head.

If filament isn’t emerging from your nozzle, or it’s coming out really slowly, rotating your plunger may help.
With a couple of hex wrenches this is a ten-minute job. Be aware that the plunger is inside a two-piece plastic case held on to the stepper by two bolts.
This is a right extruder, so the plunger goes on the left side, pointing away from the Replicator’s midline.

And then here it is with the second piece of the case attached. Note that I’ve rotated the plunger 90° so the filament has maximum contact with the plunger’s head.

When you disassemble this case be careful that the plunger and washers don’t go flying. The washers you could probably replace, but I have no idea where to get a new plunger. MakerBot’s fresh out of them.
1 Comment | 3D Printing, FAIL, tinkering, troubleshooting | Tagged: delrin, elvish plumbing, maintenance, MakerBot | Permalink
Posted by zheng3
Cleaning a Clogged Replicator Nozzle
January 19, 2013Last week I came down with what must have been the flu, and all my creativity and motivation ebbed away like so much mucus.
So I haven’t updated the blog in a while. Thingiverse redesigned its website, which broke my /dev/random scraper script, and I’ve been so busy digging out from under a pile of flu-delayed work I haven’t had the opportunity to repair it yet.
I did manage to restore my dualstrusion Replicator to full operating condition, though. Here’s what it looks like when your nozzle gets clogged.

A little bit of filament will still emerge from the nozzle, but it’s anemic and thin and bunches up around the tip. You won’t get any prints out of this.
MakerBot’s replacement nozzles have been out of stock for as long as I’ve been looking for them (about six weeks), so it’s up to you to solve this problem yourself.
They do have some maintenance tips that will help you get the nozzle off.
I skipped the “unbolt the stepstruder” step. The nozzle unscrews easily with a wrench or pair of pliers, but be careful, that little guy is hot if you’re following the instructions.
Here’s what eight months of melted PLA/ABS gunk on the inside of a nozzle looks like, as the late, great, Toshiro Mifune intimidates the nozzle into functionality.

(I have a Yojimbo poster in my office. I think I’ve seen every Kurosawa movie at least once.)
The instructions say to leave the nozzle in acetone overnight, but I think that’s overkill and, in the case of a really clogged nozzle, probably ineffective. A combination of acetone baths and physical goop removal got mine working again.
So first, an hour in acetone. Find a container that the acetone won’t dissolve. A shot glass will work. Do not drink the acetone.

I tried a few little tools before I found one that really scraped the gunk out well. Needles and bits of wire didn’t do the job, but this small drill bit did. I just stuck the bit in and twisted back and forth; no electricity involved.
Then back in the acetone bath for an hour, and then the drill bit again. Lather, rinse repeat two or three times.

Replace the nozzle, load your filament, and before you can say Bob’s your uncle, you’re back in show-booty-bidness. I didn’t even have to recalibrate the build platform.

I’m working on a couple of dualstrusion models now. Watch this space.
Leave a Comment » | 3D Printing, tinkering, troubleshooting | Tagged: acetone, flu, kurosawa, maintenance, Replicator, yojimbo | Permalink
Posted by zheng3
/dev/random: It’s that easy.
January 7, 2013
I find that “just print it” includes a lot of prep work for complex models. We’re not quite at the turn-key point yet.
I spent hours yesterday pruning vertices on the latest and greatest. It should be ready to show in a couple of days.
Leave a Comment » | /dev/random, 3D Printing | Tagged: comics, nerd humor, robots | Permalink
Posted by zheng3
An Emerging Symbiosis
January 4, 2013I’ve read plenty of articles that boil down to, “What is LEGO going to do in The Future, when anyone, ANYONE! can print their own LEGO kit in their basement?”
One can swap LEGO with whatever $manufacturer you choose: Tinkertoys, Lincoln Logs, K’Nex, Colt Firearms. (The 3D printing of firearms is a topic I’ll visit sometime soon, but for now let’s stick to things you can buy at Toys R’ Us.)
The implication of these articles is often that $manufacturer is ultimately screwed. Sooner or later, The Future will arrive and $manufacturer‘s revenue stream will dry up as we all print their products willy-nilly in our living rooms.
I see things differently.
This afternoon my son was playing with the new K’Nex set graciously provided by Grandpa and Grandma. He couldn’t find the one gray piece he needs to finish his roller coaster, so I volunteered to print him one.
Thingiverse doesn’t have the specific piece I need. Nor should they; K’Nex owns the rights to their designs and they deserve to profit from them. They’ve invested the capital in building their factories and hiring designers, and it’s their right to enjoy the fruits of their efforts. Thingiverse probably doesn’t want or need the legal headaches associated with hosting knockoff models of popular toys.
(I just realized I’m making arguments similar to those made by drug companies. Maybe there’s a path to The Future where designs go “generic” after a couple of years so that $manufacturer has an incentive to continue creating new ones? I digress.)
So Thingiverse doesn’t have the piece I need, but they do have pieces from the Universal Construction Kit, which lets one link toys that weren’t designed to be linked– Tinkertoys to Lincoln Logs, Duplo to K’Nex, and so on.
So I grabbed a K’nex -> Duplo connector, did a little vertex surgery, and now I have the piece I need as a 3D model.
To print!
This is what I got, printed in red ABS. Note the difference between my bootleg copy and the original. Cue sad trombone.
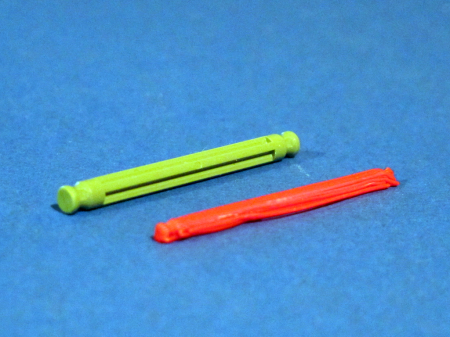
You could argue that the MakerBot Replicator is *the* top-of-the-line home 3D printer. There are others in its price range that have more or less the same capability, and if you go an order of magnitude more expensive you can get yourself a small industrial quality prototyper with superior resolution.
Part of this failure is surely inability to configure my printer settings properly, but I think a larger part of it is that the Replicator just can’t print this precisely yet. K’Nex parts are cast in ABS, which effectively means they’ve got molecular-level resolution. No way I can get that on my desktop in 2013.
A further limitation of the additive printing process is those overhangs– even if I could get the resolution right, gravity would pull those long grooves down and make the part significantly less K’Nex-able.
You might get around this by printing the entire piece as a column, but my experience in printing toothpicks vertically is that they tend to fail.
So K’Nex gets a pass until the resolution of home 3D printers increases. Maybe the Form1 will be able to do it. We’ll have to wait until the Form1 is out in the wild to see. I’m hopeful, because right now a lot of my ideas are limited by resolution and gravity.
What about lower-resolution objects, like Tinkertoys? Tinkertoys are well-within the resolution range of the Replicator. I’ve already made a couple of Tinkertoy-compatible items.
There’s nothing stopping me from printing a Tinkertoy clone right now except time, but the manufacturing process that makes Tinkertoys at gets them to the toy store (or, in my case, Amazon) is so much more efficient than a Replicator that it just doesn’t make sense, it can’t *ever* make financial sense to print these toys at home unless the price of plastic feedstock drops to near zero.
(Ultra-low-cost feedstock might happen with a descendant of the Filabot Reclaimer, but it’s not here now.)
So I don’t see home fabrication of toys taking off anytime soon, but here’s what is happening. People are using their 3D printers to extend the capabilities of their existing toys.
 This is the emerging symbiosis: traditional manufacturing is now and likely will forever provide the base of the mass-market toy experience, cranking out LEGO bricks and Lincoln Logs by the millions. Home-based 3D printers will make small production runs for niche items– gears that extend your Tinkertoys, wacky Lincoln Logs accessories, and the like. Over time, $manufacturer will adapt to the proliferation of high-resolution home printers by offering certified premium models, guaranteed to be interoperable with their mass-manufactured cousins.
 In short, I think 3D printers aren’t going to kill the toy industry, they’re going to make it much more creative. And haven’t even mentioned new toys like Dutchmogul’s Pocket Tactics, or my pet project, Seej.
2 Comments | 3D Printing, seej | Tagged: duplo, filabot, k'nex, lego, pocket tactics, The Future, tinkertoys, toys, Universal Construction Kit | Permalink
Posted by zheng3
/dev/random: 1-4-13
January 4, 2013
Occasionally Thingiverse comes up blank. There’s comedy value there, I just have to figure out how to make it work semi-procedurally.
Leave a Comment » | /dev/random | Tagged: captain creepy, comics, python, robots | Permalink
Posted by zheng3
